
59 ITEMS TO PACK FOR A CRAFT FAIR + 11 CRAFT FAIR TIPS AND TRICKS + BRANDING
Are you in need of craft fair tips? You’ve come to the right place. It’s Craft Fair Friday, my favorite day of the week to discuss tips to improve your craft fair vendor experience. Below is a great list of 59 things to pack for your next craft or vender fair event.
Now, let’s concentrate on things to help you set up your display, as well as things that you will need to pack. (You can read my Top 10 Staging Tips here). Having a good looking, well kept, appealing display determines whether or not soon to be customers will stop by or keep on walkin’.
First, I will give you the mother of all craft fair packing lists. It will include your staples like tables and tablecloths, get into snacks and sunscreen, and include repair kit items for fixing any issues that may arise. You won’t be disappointed with this list!
Then, I’ll give you 11 tips to help your display have the best layout and the right business tools at your fingertips to help you provide the best customer service. In turn, you’ll have a successful craft fair and the ability to follow up with your new found friends. Without further ado here’s the ultimate craft fair packing list:
ULTIMATE CRAFT FAIR PACKING LIST
Before we get into the setup and layout of your craft fair tent/lot, I want to give you a comprehensive packing list to get you started.
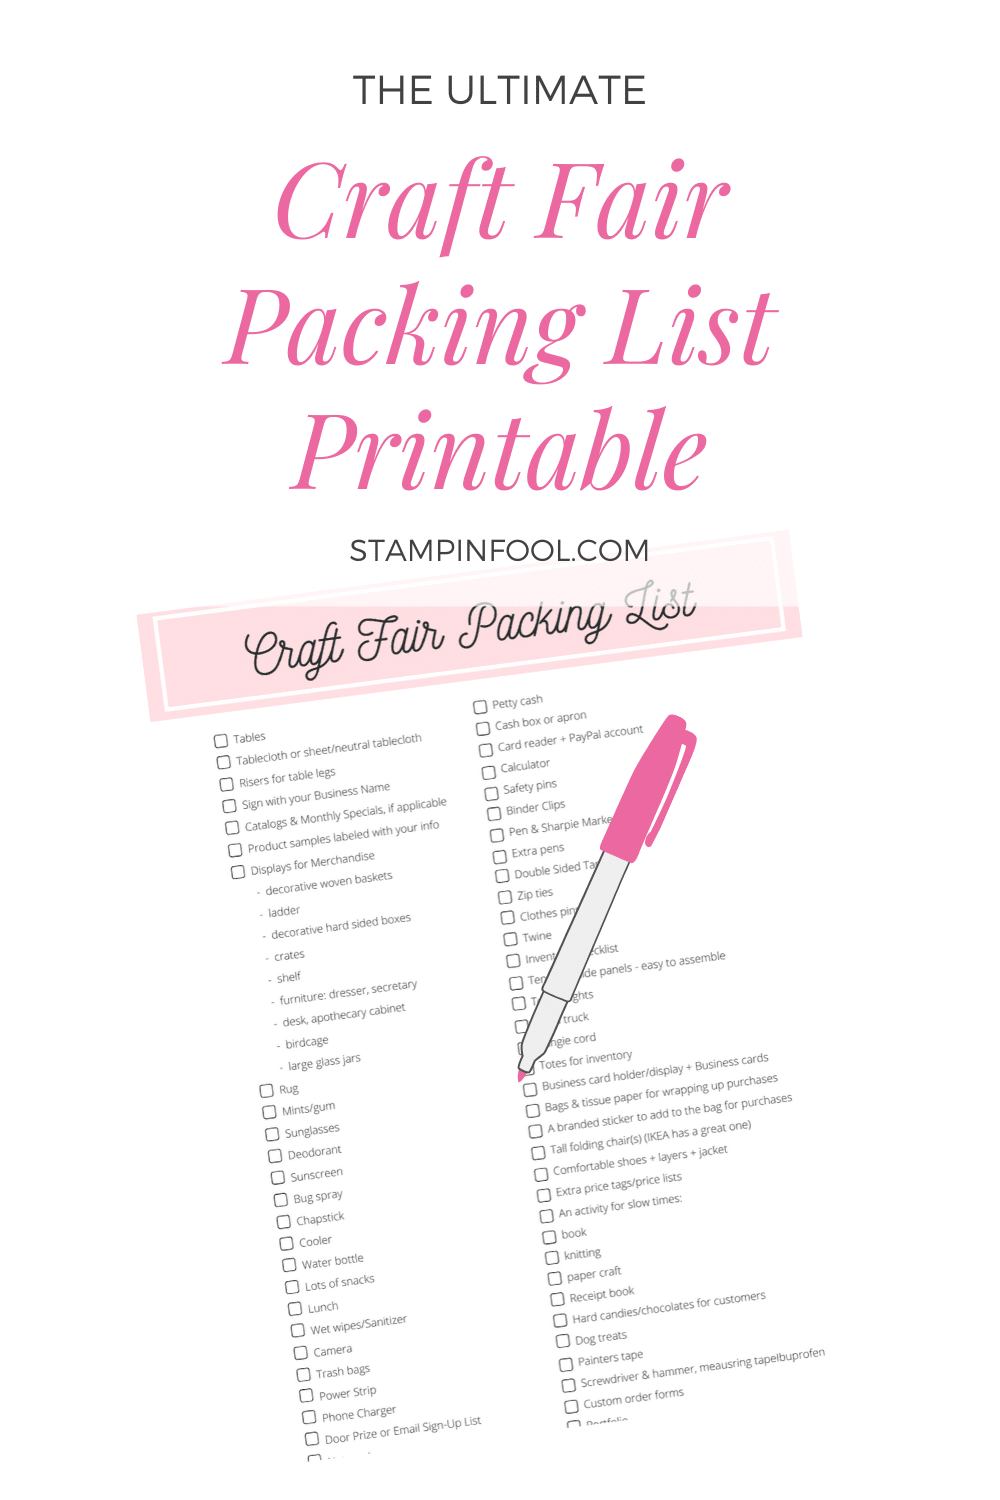
This isn’t wholly inclusive, but it is pretty close. You can grab the downloadable version of this checklist at the bottom of the post. Read it over, then print it out and use it to prepare for your next gig.
- Tables
- Tablecloth or sheet/neutral tablecloth
- Risers for table legs
- Sign with your Business Name
- Catalogs & Monthly Specials, if applicable
- Product samples labeled with your info
- Displays for Merchandise
- decorative woven baskets
- ladder
- decorative hard sided boxes
- crates
- shelf
- furniture- dresser, secretary, desk, apothecary cabinet
- birdcage
- large glass jars
- Rug
- Mints/gum
- Sunglasses
- Deodorant
- Sunscreen
- Bug spray
- Chapstick
- Cooler
- Water bottle
- Lots of snacks
- Lunch
- Wet wipes/Sanitizer
- Camera
- Trash bags
- Power Strip
- Phone Charger
- Door Prize or Email Sign-Up List
- Notepad
- Price Tags
- Petty cash *
- Cash box or apron
- Card reader + PayPal account
- Calculator
- Safety pins
- Binder Clips
- Pen & Sharpie Marker
- Extra pens
- Double Sided Tape
- Zip ties
- Clothes pins
- Twine
- Inventory Checklist
- Tent with side panels – easy to assemble
- Tent weights
- Hand truck
- Bungie cord
- Totes for inventory
- Business card holder/display + Business cards
- Bags & tissue paper for wrapping up purchases
- A branded sticker to add to the bag for purchases
- Tall folding chair(s) (IKEA has a great one)
- Comfortable shoes + layers + jacket
- Extra price tags/price lists
- An activity for slow times:
- book
- knitting
- paper craft
- Receipt book
- Hard candies/chocolates for customers
- Dog treats
- Painters tape
- Screwdriver & hammer, meausring tape
- Ibuprofen
- Custom order forms
- Portfolio
Download the list here: CRAFT FAIR PACKING LIST
Insomuch, this list is the minimum. What? While doesn’t include everything you could pack, it is a very solid list. There will be things specific to your trade that you may need to bring.
However, I’ve set up many vendor displays, interviewed other vendors, scoured craft fairs and really taken into account what works when setting up. Feel free to tailor your display to your product needs.
Related Posts: How to Make, Package, Price & Sell Glass Pebble Magnets – A step by step tutorial
Ten Staging Tips for your next Craft Fair Display
11 CRAFT FAIR TIPS FOR THE PERFECT DISPLAY
So, let’s talk about some of the items on The List and how they relate to your Craft and Vendor Fair setup. By making sure these 11 things are in order, you are setting yourself up to produce a good customer experience and make the sale.
1. BRING TABLES
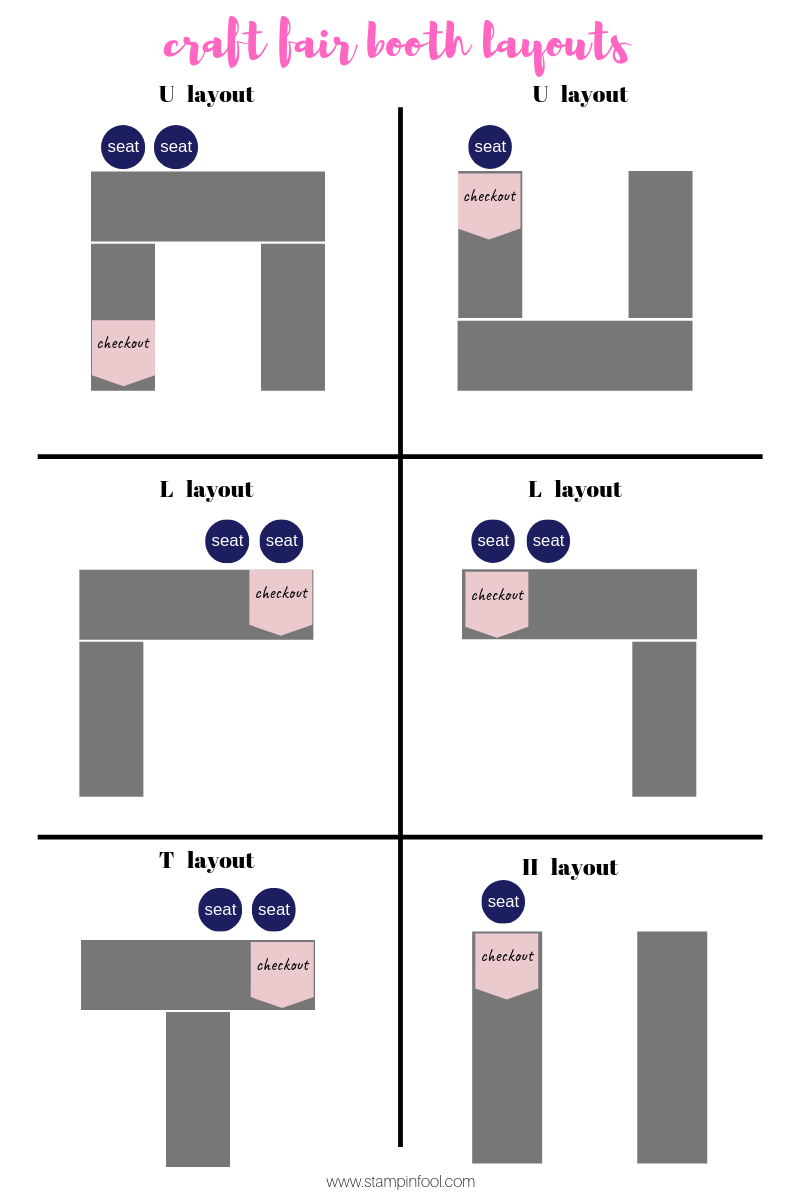
For a 10′ x 10′ booth, use an 8 foot table and two smaller 6 foot tables. Using tables this size can be configured into a few different ways to lay out inventory: a U shape, T shape, or an L. (See the 6 example booth layouts under #6).
TIP: First, verify the size booth you are assigned (bring a measuring tape). On occasion I have vended fairs where I registered for a 10′ x 10′ space and when I arrived I am squeezed into an 8×8 space.
Next, don’t be afraid to let the organizer know & work out the details. If you paid for a certain size spot, then that is what you should have. After all, you will be armed with a setup plan specific to the square footage you registered for and can’t risk your tables not fitting because the organizer did not correctly configure the space.
The Trial Run
First, set up the layout in your garage/home to see how you want things displayed on the tables. I highly recommend measuring out your space and setting up a mock area with the table orientation. Next, move items around until you are happy with the display. Lastly, don’t forget to take photos so you don’t forget how you want it to look. Snapping quick photos will save you a TON of set up time!
2. USE PLAIN TABLECLOTHS
A queen size black or neutral sheet works to cover the table better than a tablecloth and is cost effective (hello, Walmart). You can use safety pins to tack a fabric or printed “Business Name” sign to the front of your display tables.
What color table cloth should I use?
BLACK, WHITE or LINEN. In the hundreds of displays I have set up, consulted and observed, using a solid color that is neutral is the best way to go. It makes the colors of your products pop. Don’t believe me? Search Pinterest for craft fair displays. Which displays do you like? Do you love the ones where there is a color theme throughout. Yes! That is a result of being able to see the color of the products because the tablecloth doesn’t detract from the products.
Natural Linen
Linen is neutral and doesn’t detract from the items you will be selling. This is the only exception to the black and white rule of thumb. Because burlap and linen are trending, this would fall into the neutral color category. So, your items can be the show stoping highlight of your booth and won’t get lost in the light color of your linen backdrop.
But I love PINK, you say. DON’T DO IT. I’ll drop a little honesty here- it looks tacky. Maybe your friends won’t tell you, maybe someone complimented you. They lied. Don’t do it. Stick to neutral and let your crafts do the talking. Go to Bed Bath & Beyond and buy the $12 black tablecloth or Walmart twin sheet. You won’t regret it!
USING COLOR
But you should use products to incorporate color, not the tablecloth. Organize your products by color. Examples: arrange soap handmade by color, group quilts by pastels, brights, neutrals, paper crafts can be sorted by type and each type organized by like colors.
3. HAVE A SIGN + BRANDING
Having a SIGN IS A MUST. You should have a sign that is large enough to see/read from a distance and matches your branding.
Example: You sell paper crafts, don’t use a sign that has dinosaurs on it; in the same way, if you plan children’s birthday parties, you can use a dinosaur or tea party themed sign to convey visually what you do.
Do you make wedding/bride themed items? Don’t use a sign with cute puppy dogs, because it doesn’t translate to what you are selling. You get the point.
Make sure the color, font, and name brand are all consistent with your products.
BRANDING
Now, let’s take a minute to talk about what branding is and how to achieve it. Branding is by definition the name, symbol, and design that represent your company. It relates to so much more than just the design aspect of your business.
Branding sets the tone for the type of business- casual, formal, professional, fun, technologically savvy, etc., because it tells the customer about you and your business. If you choose elements correctly, it leaves subtle hints helping customers determine whether they like you and want to work with you (or buy from you).
Let me give you two examples.
Example 1: A company has a website with a bright colorful logo with a scrolly font. It has an illustration a ball of yarn. What do you expect to see? A cheerful person selling brightly colored scarves and hats. You get to the shop and it’s a colorful booth full of hand knitted items and the owner quickly introduces herself, then asks how you day is and offers you a coffee while you shop.
In example 2: This vendor booth has a sign with with small font that you can’t read from a distance. You get up close and it is a printed banner sign in plain text with a “Jane’s Handmade Clothing & Accessories”. Then when you look at the items they all appear to be flea market finds- lamps, a few candles, some holiday decorative items and a few knit scarves.
Was the second stall what you were expecting? Probably not, because you would expect a whole lot of handmade scarves, hats, and sweaters. This is an example of inconsistent branding or connecting your brand with the wrong items.
WRAPPING UP BRANDING
Previously, I brought up branding with regard to your sign and what the sign looks like and how it should reflect your overall image, specifically, what you sell, how you sell it, and how it looks.
Take some time to really think about what and where you want to be. And tailor your message to that and apply it to your logo, signs, business cards, website, flyers, and anything that has your business name attached to it.
For a more in depth look, read this article: What is Branding?
And you can download this Awesome Brand Workbook from PWC.
4. BRING CATALOGS
If you sell from a direct sales company, make sure to have catalogs on site. Because, if people like what you are making or selling, they will like other products in the catalog as well.
Make sure your contact info is on them- name, phone, email, WEBSITE.
Nonetheless, if you aren’t in direct sales, but have handmade items, having a custom order binder would be an asset. Use photos of past work, other custom orders, colors and themes from which you can customize and place the info in clear plastic sheet protectors in a binder as your portfolio. Don’t forget the custom order forms as well.
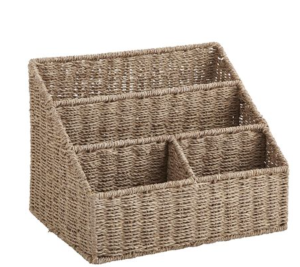
CATALOG DISPLAY
This magazine basket from Pier 1 Imports is great for holding a few catalogs upright and business cards in the front.
Business cards are easily accessible for other vendors who want to network and place special orders. Fill the other sections with spare pens and door prize forms or contact cards. Place it by your checkout station.
5. SAMPLES
If you have a handmade product for which samples can be made, this is a HUGE winner. Examples: mini cold process soap, note card/paper craft, paint your own mini canvas, jewelry charm, mini candle. A takeaway will can lead to a future sale, a product referral to a friend, a good review, a purchase the second day of the event after thinking about how much they love it.
Before you dive in, know your market. Make sure that the customer base/location you are having the event is one that is known for selling a lot of inventory and having traffic. If the event is full of non buying shoppers, it can be a money pit. If you find this is the case, pull the samples or be selective- keep them under the table and offer them individually if you think it will seal the sale.
6. TIPS FOR TABLE DISPLAY
It’s time to talk about your table display for craft fairs. You’ve brought your inventory and supplies and your emergency items for any potential disaster, so let’s get to setting up.
Do a trial run
Use painters tape to tape off the vendor space, typically 8’x8′ or 10’x10′. Set up the table positions and inventory in your garage/living room. Typical table sizes are 6 foot and 8 foot long. There are a few common layouts- L, U and T.
Here are those common layouts visually.
Once the tables are arranged, you can start to place product. Pare down selected products that you think will sell best for that event as well as look ascetically pleasing. Don’t overcrowd the table tops. Stick to a selection of products and colors, but leave room on the table.
You don’t want customers to be scared to touch and look at anything because they might bump other products or knock something over.
Keep extras organized under the table, easily accessible but not within sight, preferably in tubs. If you keep inventory in tubs, it is easy to transport, store under your tables and bring out more as needed to keep the tables properly stocked.
Keep in mind your movement patterns and checkout station when choosing inventory placement. You’ll need space to take payments (by card or money box), wrap and bag items, and mark your inventory list as sold. Also, you’ll want customers to easily navigate through your booth, so be mindful of the table layout and how they will move through the space.
7. GIVE A DOOR PRIZE
Do you need a door prize? YES. Yes, you need a door prize. It is a great way to get customer contact information. Make sure to include their name, email address, phone number with an “okay to text” box or an email sign up checkbox.
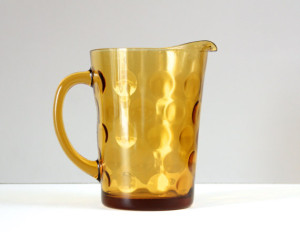
Offer a free gift or coupon code for signing up for your newsletter. Grab a pretty bucket or bowl- I use a pitcher (like the one below) that customers can fill out the form and drop it into the bowl.
WHAT YOU NEED: Door prize forms (make a Word document with 4 to a page), bucket of pens, bowl/pitcher to collect them in, mini clipboards to use for filling out form & CHOCOLATE to attract your customers.
WHAT TO DO: Take notes on them. After Suzie Shopper walks off and she raved about that handmade wreath in your shop, discretely pull her door prize form out and jot down a note about her- the word “wreath”, “call for wreath making party”, wants more as gifts, “newsletter” – something to remember her. And write down what was significant for you to follow up with.
8. USE PRICE TAGS/SIGNS
This is debatable. I have heard vendors say you should keep it discrete and I have heard some say make it big. Whichever way you choose, I suggest having pricing easily readable. Tags can be placed under the item so it is discreet.
We know a customer is more likely to walk away than ask the price of an item. To avoid losing a potential sale, having the price on the product or on the bin is the best choice.
Pricing boards are another option, but beware that these can be confusing to the customer who has to guess what the product is called to find the price, especially if it is handmade goods. However, I do not recommend this option.
9. HAVE ENOUGH PETTY CASH
This one is easy. Have a bag of petty cash in $1, $5, $10, $20. Overestimate- have $100-300 for a small event (high school fair, local community center) and a larger wad for a multi day event with 200+ vendors (concert, outdoor event regionally known, state fair).
10. MAKE A REPAIR KIT
- Safety pins
- Sharpie Marker
- Double Sided Tape
- Inventory Checklist
- glue, stapler, calculator, twine, scissors
Have an emergency repair kit put together. On the list of 59 Items to pack, there are a number or “fix it” items. You should group those together and put them in a large ziplock bag or 31 Tote (shoutout to 31 for handling all of my bag needs). Because, if something goes awry, you’ll know where you put the supplies to repair or fix the issue. You won’t have to hunt through the 45 plastic bins full of inventory to find the fix-it kit.
11. SUPERIOR CUSTOMER SERVICE
While it’s not something you can pack, knowing customer service and sales skills are important. Stand up and take a genuine interest in your shoppers. Nothing looks worse than a seller hidden behind the table, seated, reading a book, and not paying attention to the lovely people taking time to shop at her booth.
So, be alert, friendly, and stand up to greet your guests. They are your guests, after all. You can have a seat when there are no shoppers around. Better yet, opt for a high stool for times when it is busy and your feet need a break, but you want to maintain a presence.
Struggling with Small Talk?
Similarly, offer product suggestions. Then, offer samples freely. Finally, ask your customers if there were any interesting booths and what great products they found throughout the fair. This is a great way to engage them. Overall, be genuine. And, have a cheerful attitude and enjoy their company.
CONCLUSION
In conclusion, there are 11 major takeaways to elevate you craft fair experience, in addition to the ultimate packing list. Start using these tips to have the best vendor fair selling experience.
- Use a sheet, it’s bigger than a tablecloth. Keep it black, white or linen.
- Apply color wisely.
- Have a sign and consistent branding.
- Don’t overcrowd; you don’t have to put out everything!
- Always have a door prize drawing and free samples. Lure them with candies.
- Invest in a catalog/info display piece.
- Have business cards available for the taking.
- Make a custom order portfolio and forms.
- Have a well stocked checkout station.
- Stand up! Nothing looks worse than an uninterested seller.
- Interact. Talk to patrons, smile often, and offer to help.
- HAVE FUN!
I hope this post has been helpful in your craft fair endeavors or in upping your game for the next event. Attending events is a great way to make income, network with other vendors, and find new customers.
Lastly, if you have any questions or need staging help, feel free to leave a comment below or shoot me an email. I offer consulting services and advice on staging your event as well as troubleshooting for specific problems. I appreciate you dropping by StampinFool.com!
Related Posts:
How to Make, Package, Price & Sell Glass Pebble Magnets – A step by step tutorial
Ten Staging Tips for your next Craft Fair Display
Grab the Free Printable here: Ultimate Craft Fair Packing List Printable
LOVE IT, PIN IT
Hi, I hope you can still help. I’m having my 1st major indoor event. I sell homemade seedpaper greeting cards. The space is only 9×9. Sounds like a difficult setup. Do you have any suggestions? All my displays are geared towards large tables. Do ppl tend to separate themselves with dividers? I’m not sure the etiquette. Thank you.
I would set up in a U shape so customers can come into the booth and have long sides to shop on and a back counter to check out!
I will be doing my first craft fair and I’m so excited!
It’s in a parking lot and the size is 9’ x 18’. Any suggestions on a set up?
Thanks! I appreciate the feedback. My brain gets ahead of my typing. I’ll give it a reread!
Good luck at your next craft fair.
You have given some wonderful advice which I will use in my next craft fair set-up! Thank you!!!
In exchange for your advice, may I gently suggest a quick re-read before posting? There are areas in this post which show you contemplating word/sentence structure options but you didn’t go back to make choices. IMHO, clear communication provides increased credibility.
You’re welcome! I’m so glad to help. Good luck!
Thank you so much! I am doing a small house party and I have never sold my crafts before. I’m so nervous about it, so I need all the tips I can get.
That’s a great idea to raise the tables!
i really like your site and comments. BUT, your picture of your display has one major flaw….please don’t take offense, so sorry, but your tables must be higher. they are too low. Or you must be really tall. This is one thing i learned. they can easily be raised using pvc pips with cotter pins or bed risers. if your tablecloths are not form fitted you can move them in front a little more and they will reach the ground for a neat look.