
Top 10 Craft Fair Tips You Need Before Next Arts & Crafts Vendor Event
Are you ready to learn the Top 10 Craft Fair Display Tips? I am going to unload some invaluable information for you craft fair friends. This will provide you with the tools & confidence you need to start vending and ease your mind about the craft fair experience.
Because staging your booth display is so very important we are going to cover how it should look. This can increase your sales and create a brand to help customers remember your store when they have a specific need that you can fill. In order to create a pleasant shopping experience, you will want to take measures to unify your brand across each component.
Top 10 Craft Fair Display Tips
I have compiled a list of ten things that are important for crafters to take into account to have a successful fair experience. You want to provide an inviting booth for the customer to enter and interact with.
It can be overwhelming to change everything you have ever known about craft fairs all at once, so start slow. Start by implementing one thing at a time. As you have free time, make another change you feel comfortable with your setup. Once you have utilized all of the tips, you will be in prime shape to have profitable events.
BOOTH DISPLAY & PRODUCT STAGING
- Use Color
- Avoid Clutter
- Group Like Items
- Use Holidays
- Be Cheap!
- Demonstrate
- Create Vignettes
- Display Business cards & Attention Getter (Candies!)
- Use Height
- Have Signage
- *BONUS*- Markdowns
Now that you have the outline for each important component of your craft fair display, I am going to talk in detail about each item and how to maximize it’s usefulness in your space.
1. COLOR
Let’s face it, appearance is everything for your table setup. Your buyer is going to be lured in by the appearance of your booth. But, you could be turning them away by a rainbow that vomited all over your tables.
First, use neural colors to your advantage by choosing a color scheme that won’t detract from your products. Keep the table cloths to black, white or linen. Let the products be the colorful display that attracts guests.
These color guidelines go for the display pieces as well. Make the boxes, bins, shelves and display hardware neutral. Your products will stand out against the plain background. Avoid patterns in the hardscape of your display as well.
Make sure the products stand out and are the main focus of your booth. If you have a rainbow of products, stick to a solid white or all black color scheme for table cloths, baskets, bins, signs, ect.
You can spray paint any colorful product holders with Valspar primer/outdoor paint. You can find it on the paint isle of your local Home Depot; It comes in neutral colors. It sticks to plastic well so if you have dollar store bins for holding products, you can spray them to coordinate.
Lastly, a note on neutral products. It’s 100% okay to have neutral products. This actually adds to the clean look of the product and can be a huge selling point.
2. CLUTTER
Next, avoid clutter like the plague. Seriously, if you have too much inventory for your table, leave extras below the table and put them out as needed. You don’t want to have your items piled so high that a customer has to dig, or knock over other products to look at the one that interests them.
Don’t clutter, don’t be bare- have a good assortment of like items and store the rest under the table in bins until space frees up. After you start seeing gaps you can replenish what has sold!
3. GROUPING
I cannot stress enough how essential it is to group like items. Think about it- when you go to the grocery store are the eggs next to the canned green beans? NOPE. Keep the eggs with the eggs, or in your case, the purses with purses, cards with other cards, jewelry all together, scarves with scarves and food with food.
Don’t put one of each thing all over the place, group the similar items and multiples of the same item together. You can extend this to color grouping of your products for a real eye catcher.
4 . HOLIDAY ITEMS
Next, use upcoming holidays to your advantage. Customers are driven by holidays. Think to fill specific needs for the upcoming holiday, example: cute little gifts of hot cocoa mixes, autumn hot tea pods; spring bunny candy or flower themed wreaths; or back to school teacher gifts.
Your shoppers will be oohing and ahhhing over every little thing. As a selling tip, this will give them a reason to buy that cute holiday craft!
Plan out your holiday items a month to 6 weeks in advance of the holiday. If you are too close to the holiday, they may have filled their gifting list or not have planned for it.
5. BE SAAVY
Be smart with the setup, that is. You don’t have to buy things for your set up. Look around your house: that empty amazon box (oh I know you have some laying around!), use it underneath the table cloth for height.
Use a magazine basket to hold soft blankets or quilts that contrast with the hard basket weave.
The storage ottoman in your living room makes an adorable way to display quilts, blankets, or to raise bins of assorted crafts in to add surface space to your display.
Ladders can be excellent display pieces. They attract customers because it’s unique. You can add planks to each stair for added space for small items or bars for hanging clothes/knits.
Lastly, think about pieces of furniture or accents in your home and how you can borrow them for your craft fair booth. If you are going to buy, shop around for the best price. Did you know it is cheaper to buy a twin sheet (Amazon) for a table cloth than a craft fair designated table covering.
6. DEMONSTRATE
Nothing gets the attention of shoppers like you making your crafts in front of them or letting them try it out. I’m not telling you to make items and ignore the customer, but it is interesting to shoppers to see you in action. Bonus points if you have a little station set up to make a card, stitch a felt flower together, or make a mini ornament.
It likely won’t make them go out and start a competing business, but it will help them remember the cool thing they helped make, or saw you making first hand, or took home as a memento. It will make them feel special (they are! they keep your love of crafting alive) and it will help you stand out in their memory.
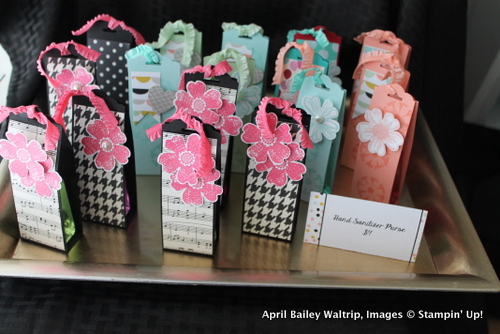
7. USING VIGNETTES IN CRAFT FAIRS
(vin’yet) n. a small grouping of objects that create a pleasing focal point and tell a story.
Here is an example of a grouping of hand sanitizer packets (See my Tutorial here) on a gold tray with a little tent sign. It looks like a bathroom counter display (mimicking the soap theme).
8. CRAFT FAIR TIPS: BUSINESS BASICS
Don’t forget to place your business cards out on display, which should be equally as cute and crafty as the items you are selling. You want people to contact you in the future, so make sure they are visible. You also want be able to follow up with buyers to let them know about sales, other events they will find you at and any customer or referral special you may have, so GET THEIR CONTACT INFO.
A great way to do this is a door prize form- name, email, phone number! It is a must- how can you follow up with them if you don’t have their info.
*Vendor tip*- Of someone seemed particularly interested, I pull their entry form back out and jot down a note on the back or jot down their name in my planner so that I remember who to follow up with and for what items interested them most.
Lastly, it’s always good to lure them in with chocolate. Set out some chocolates or hard candy next to your business cards and door prize so they are sure not to miss it!
9. HEIGHT
Height is your BIGGEST advantage in a limited space (get it? haha). A lot of small events provide only 8×8 or 10×10 spaces. That’s enough space for three strategically placed tables or less. You need to make using height a priority in your set up. That means hanging things from your tent, peg boards or racks that allow for items to be placed in your vertical space, baskets on the ground, items on the tables and boxes under the table cloth to give areas height. Not only does using height give you more square footage, but it looks aesthetically pleasing as opposed to everything being on all one level.
10. SIGNAGE
Lastly, signage is so important. How will customers know who you are or what you are selling if you don’t have a sign? It speaks volumes about your business, the product and the brand.
From your sign, they will instantly know what type of items you sell, what your business name is and your affiliation, if any.
For me, that means displaying my logo sign on my front most table cloth, as well as handmade banners with the same adorning the tent or other sides of the table so that it is visible from almost anywhere in the venue. From the handmade banner, they will know I make papercrafts, that my brand colors are pink, black and gold, and my font is fun and scripty.
You should also brand your business to suit your products and personality. It will visually tell your customers about you and your products. Make a sign or buy a sign, but definitely have more than one sign and make it personal and equivocal to your business.
**BONUS** MARKDOWNS
I’m going to give you one more tip as a bonus.
We all love a SALE, right?! People innately LOVE getting a good deal. Want to seal the sale? Add a markdown sign with items listed and the prices slashed with a new, lower price highlighted.
Your patrons won’t be able to pass up a good deal and that will ensure that you make the sale. Slashing the regular priced inventory in the afternoon is a good way to get rid of inventory that isn’t moving.
Lastly, if you missed the previous Craft Fair Friday posts, you can see them here:
Related Posts: Have you read my #1 Craft Fair post? How to Make, Package, Price & Sell Glass Pebble Magnets
18 Affordable Baskets and Crates for Home Decor
I want to hear all about your recent craft fair experience. Do you already use these tricks? Are you going to pick a few and try them out at your next show? Have they helped your sales? Let me know by leaving a comment below! As always, happy crafting!
COLOR impotartant in front side of booth. Stand out. Make something special to draw people’s attention. Use your items but don’t expect it to sell. Place on a pedestal. Come on! Your a crafter you can make anything. Look at displays in stores take pictures.Gets juices going
Ifound old hard suitcases . Strip out insides. 1 case stands vertically , cut a piece of wood to fit each side covered in white textured wallpaper. Glued in wood then put 4 screws from back ( outside of case) hang jewelry from push pins . Leave jewelry in standing open case.for display . when done close . I put extra jewelry in case for other displays place over another piece of jewelry. 2nd case .keep FLAT . .fill with jewelry displays in jewelry trays use push pins to hold in place , use paint rollers under top of trays to slant. close case leave on table for other displays When done repack trays Important when packing keep flat case flat other case vertical . I bought real jewelry trays with velvet insides each tray fits into each other , or use painted boards (put bubble wrap in between boards when packing to keep jewelry in place & not to ruin jewelry) leave case flat and vertical when traveling to & from show so displays don’t fall .
I’d love to see it. Email me photos and I’ll send some tips.
You offer great tips. Some I have been using. In a 3 day show I might have 10 thousand people there and only have 2-3 hundred people come into my booth. What am I doing wrong? Can I send you a viedo of my booth? I would like to improve.
Guy
I like what you have said and I am doing some of these things. I would still like to improve .
Can I send a viedo of my display to you to get a critique ? Where do I send it? I have been in street shows or festivals and people just don’t come in. There can be ten thousand people on a three day event and I will get about 2-3hundred that come in to see my paintings. Help!
Great tips. 1 of mine. A come on!! On a pedestal that is. about 28″s high I place a flat Large wood tray filled with bracelets for children all sizes up to 7.5″s teens and moms take also. (Done on7mm stretch cord) price $1.00 each. Use left over beads but I buy some pinks and purples also primary colors (4mm-8mm). Draws the children they buy and Mom enters booth Got them! Can sell between 75-100 a show easy money for sitting in front of tv and stinging. Place a sign for the small fashionistas with price. Good luck
Thanks Kathryn! I’m glad you enjoyed the tips and tricks.
Great resources on the Stampin’ Up! arts & crafting business…Thanks, Kathryn McHenry