59 Packing List Items for your Craft Fair Display in 2019
Having a craft fair packing list is a good starting point for your craft fair endeavor. Second to making the products you are selling and doing a mock setup, this is the most important thing to have with you at the start of craft and vendor fair season.
If you haven’t yet figured out how you will be setting up a craft fair display, read this post with my 10 Tips for Having a Great, Cohesive Craft Fair Display.
TIPS FOR PREPPING YOUR CRAFT FAIR DISPLAY BOOTH
Now that you are up to speed on creating a cohesive look for your craft fair display, you have chosen your color scheme and theme, you can begin sourcing display items. Importantly, depending on the size, quantity and style of your inventory, you can start collecting pieces that will work well with your items. Below, I have listed a few sample theme based displays.
[table id=2 /]
In short, you should break down the display plan by the color scheme and how the products will show against a back ground. Most often the background will be neutral- white, linen, black or untreated wooden tones and the products will use color to attract customers. For continuity’s sake, organize colorful products in a manner pleasing to the customers eye.
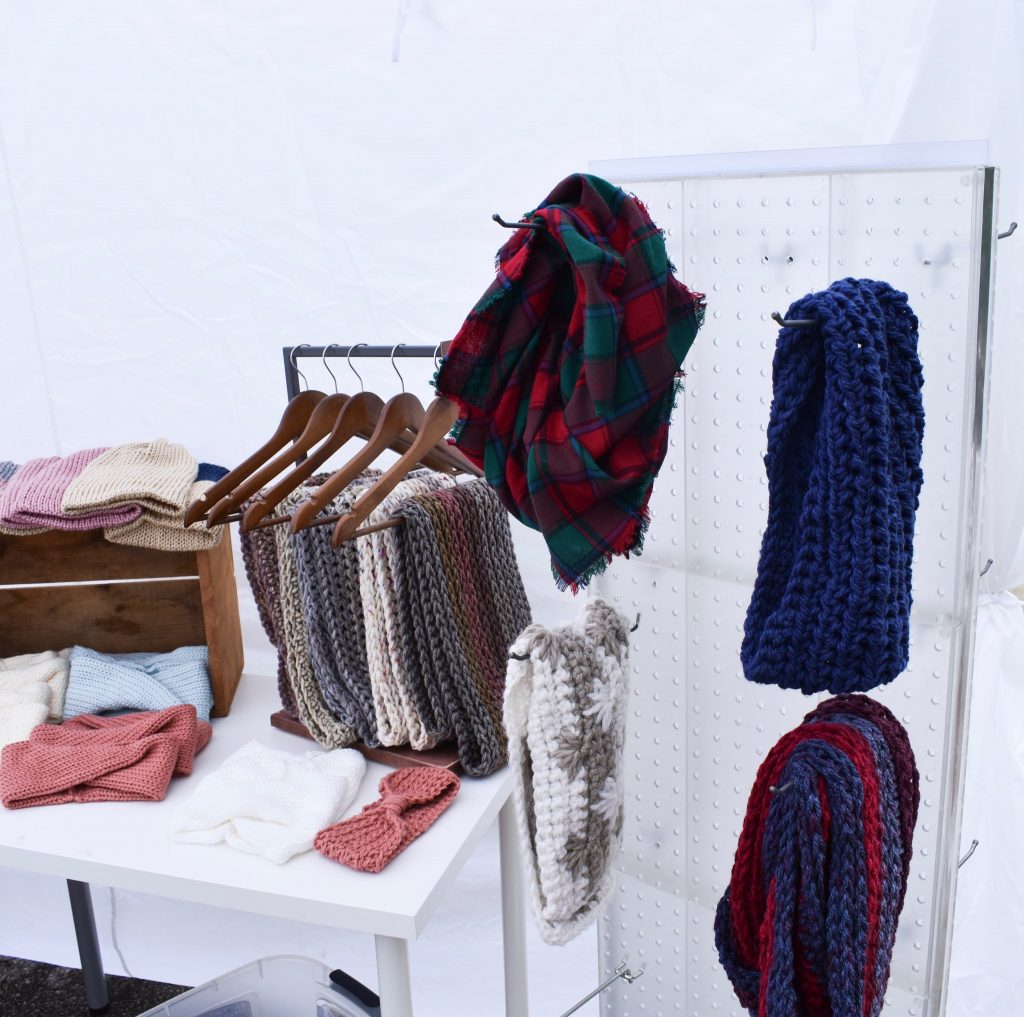
Display ideas for Merchandise
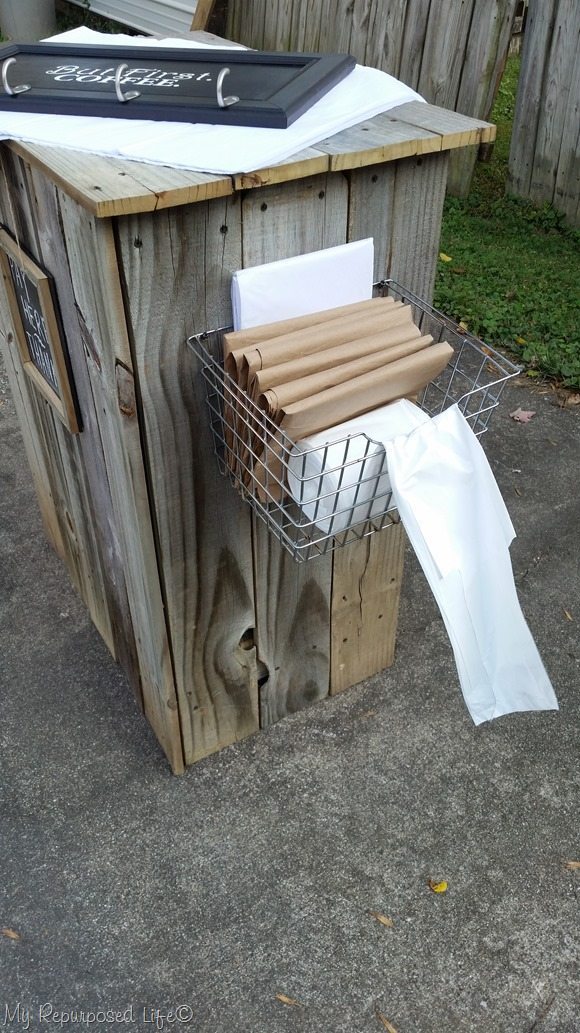
Additionally, you can repurpose household furniture or vintage pieces to use as part of your display versus a typical layout of a few card tables with table cloths. This isn’t to say you shouldn’t use tables, but using additional pieces gives you the advantage of height, more storage space and character.
For example, we know we should only display a number of items for sale to avoid overcrowding so a 5 drawer chest would be the perfect piece to stagger two drawers with folded items, use the top for additional items on a small rack, and store your excess inventory in the bottom three drawers.
-
- risers
- baskets
- ladder
- decorative boxes
- crates
- shelf
- furniture- dresser, secretary, desk, apothecary cabinet
- birdcage
- rope/twine strung between fittings


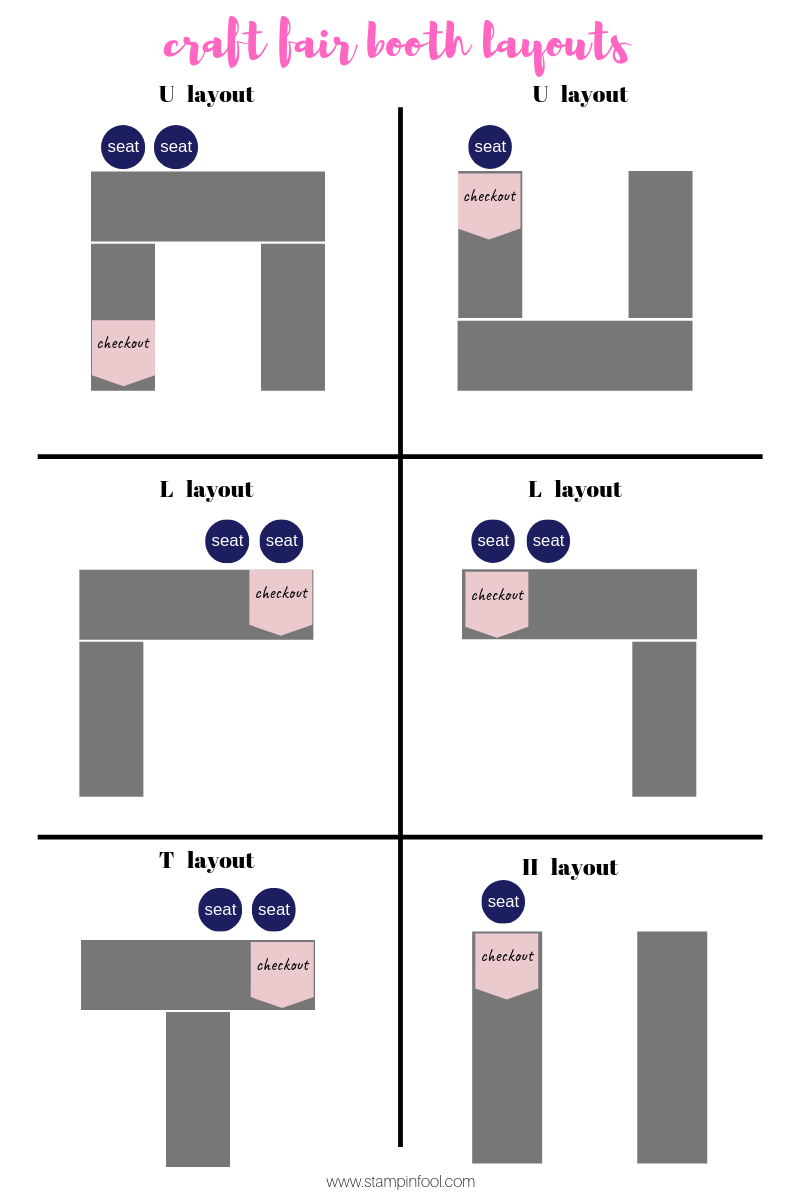
MOCK DISPLAY
Now that you have the products you have crafted, a solid theme/color scheme and an idea of what pieces you will use to best display your products, it’s time to see how all of the pieces fit together.
- First, grab a roll of painters tape and tape off the floor of your garage or living room to the dimensions of the space (commonly 10′ x 10′).
- Next, begin to set up a mock display, using the space efficiently and making the products easy to access, easy for you to move around the booth, and with a clear checkout station in mind.
- Make sure you move around the space, practice taking items out of storage and packaging up purchased items. This will help you get the layout comfortable and visually pleasing.
WHEN TO PRACTICE
First, you should run this mock set up prior to the date of the event. A rule of thumb is to do a mock set up 3-4 weeks before the start of arts and crafts show season so that you have time to buy, build, or order anything you are missing.
Before deconstructing the setup, take photographs so that you can easily recreate the layout and product placement. Pack the items according to how they will be displayed with extras by like types.
Additionally, after you have a layout perfected and photographed, practice loading and unloading your entire craft fair stall into your vehicle.
Finally, if you can’t fit the furniture or it is too heavy to move back and forth to the location (possible bumpy and yards away if it is outdoors), then you must regroup and swap out those display pieces for a more manageable setup.
WHY YOU NEED THE ULTIMATE CRAFT FAIR PACKING LIST
Now that we have thoroughly discussed how to plan your craft fair layout and display ideas, next you’ll need to pack some additional items to help you through the event.
While this list of 59 must have items is fairly exhaustive from being a vendor, talking to vendors and reading many articles and comments on what to pack, you may have additional preferences.
In addition to comfort, you need to have a craft fair packing list so that you can maximize profits and be prepared for any hiccups during the event. Being fully prepared to both sell and fix any problems you encounter will make your vendor experience smooth sailing.
You’ll have all of the tools you need to set up your booth, make the first sale, package the sale and fix any display pieces that may go awry. The list includes water, snacks and sunscreen for your comfort.
Of course, little things inevitably go wrong the day of the event, but with this list and a packing plan, you’ll have the tools to tackle any minor disaster from your tent moving, to rainy weather to falling parts of a display (thanks to tape or a hammer).
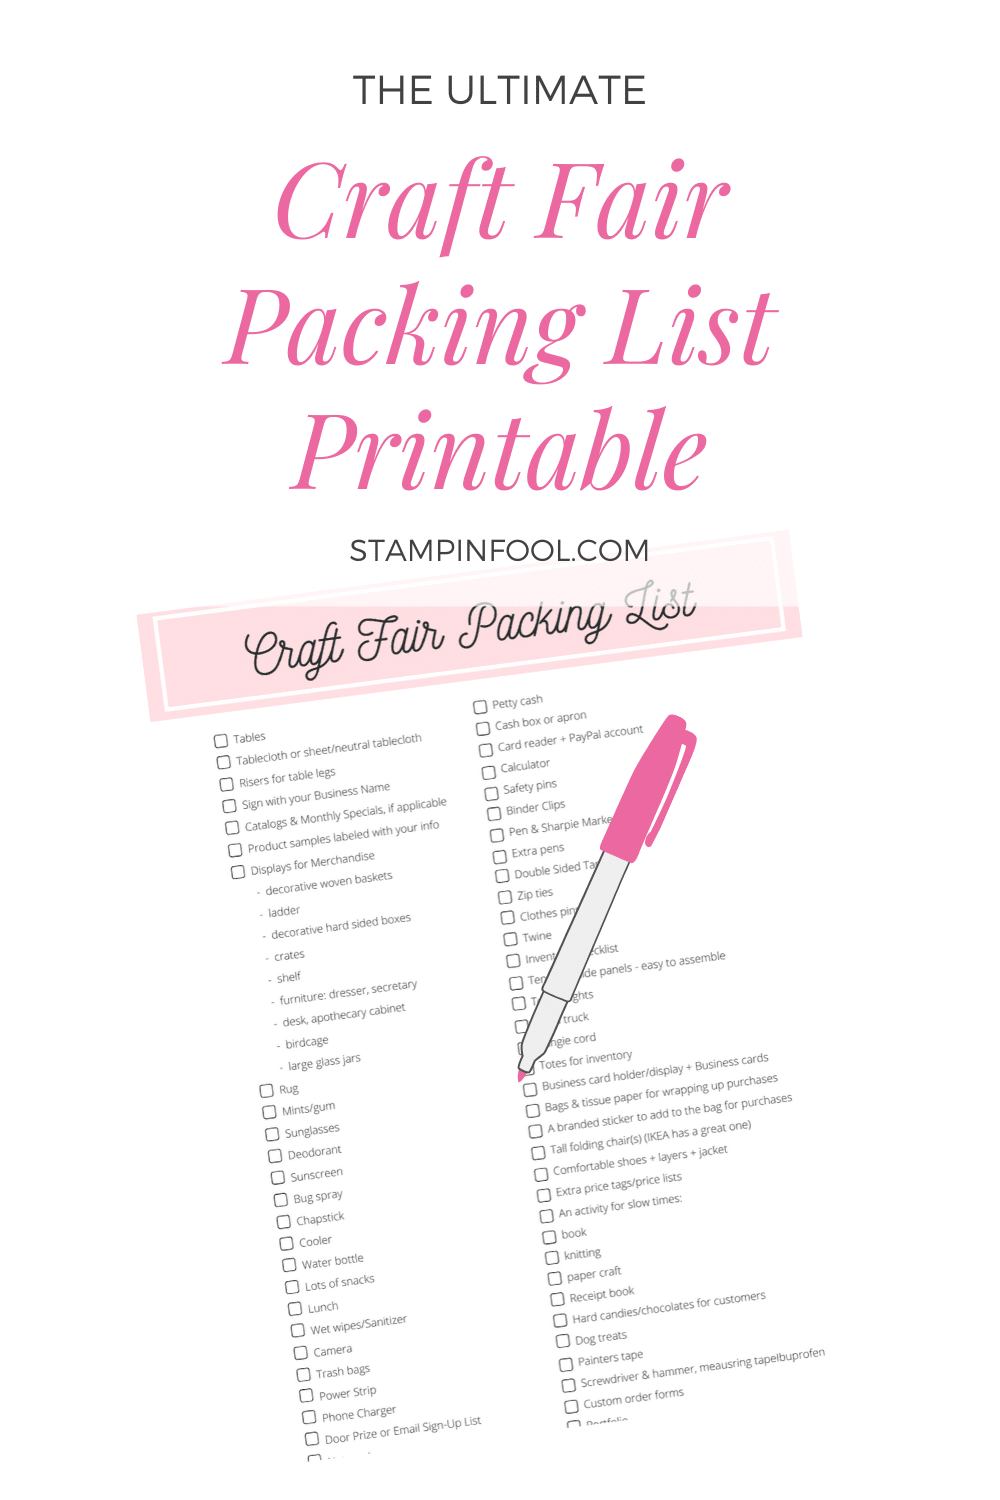
At the bottom of the craft fair packing list is a link to download and print the pdf so that you can check off items as you pack them, notate which bin they are packed in, and add anything that meets your craft fair needs.
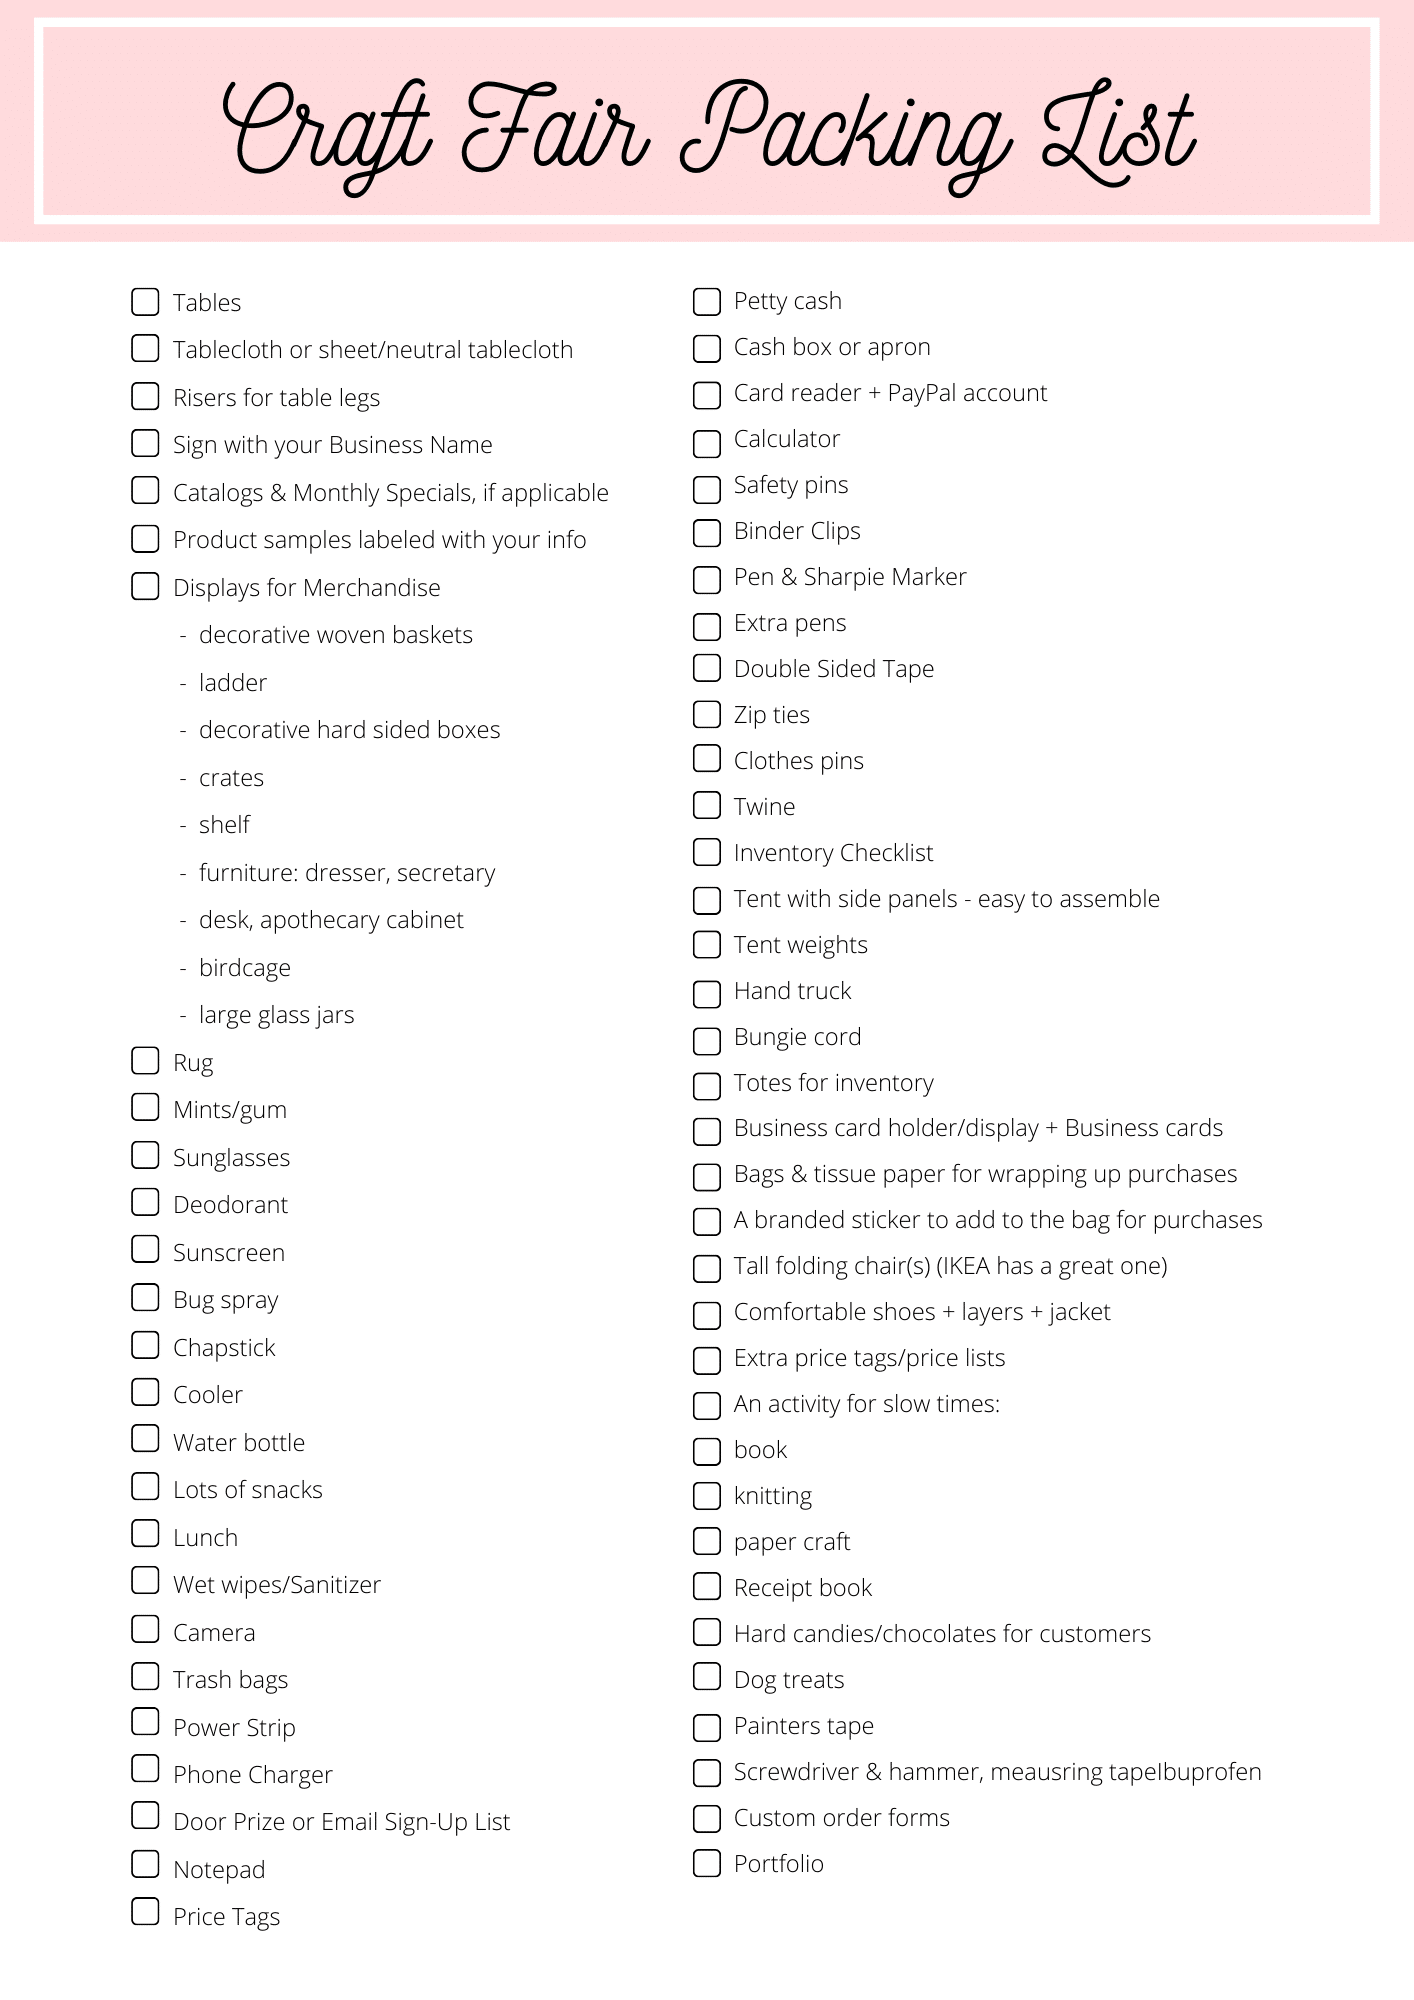
PACKING LIST
- Tables
- Tablecloth or sheet/neutral tablecloth
- Risers for table legs
- Sign with your Business Name
- Catalogs & Monthly Specials, if applicable
- Product samples labeled with your info
- Displays for Merchandise
- risers
- baskets
- ladder
- decorative boxes
- crates
- shelf
- risers
- furniture- dresser, secretary, desk, apothecary cabinet
- birdcage
- Rug
- Mints/gum
- Sunglasses
- Deodorant
- Sunscreen
- Bug spray
- Chapstick
- Cooler
- Water bottle
- Lots of snacks
- Lunch
- Wet wipes/Sanitizer
- Camera
- Trash bags
- Power Strip
- Phone Charger
- Door Prize or Email SignUp List
- Notepad
- Price Tags
- Petty cash *
- Cash box or apron
- Card reader + PayPal account
- Calculator
- Safety pins
- Binder Clips
- Pen & Sharpie Marker
- Extra pens
- Double Sided Tape
- Zip ties
- Clothes pins
- Twine
- Inventory Checklist
- Tent with side panels – easy to assemble
- Tent weights
- Hand truck
- Bungie cord
- Totes for inventory
- Business card holder/display
- Business cards
- Bags for purchases
- Tall folding chair(s) (IKEA has a great one)
- Comfortable shoes + layers + jacket
- Extra price tags/price lists
- An activity for slow times:
- book
- knitting
- paper craft
- Receipt book
- Hard candies/chocolates for customers
- Dog treats
- Painters tape
- Screwdriver & hammer, measuring tape
- Ibuprofen
- Custom order form
- Portfolio
DOWNLOAD THE PDF HERE: CRAFT FAIR PACKING LIST
CHECK OUT STATION
Have you printed and packed yet? Are you exhausted yet? After all of the crafting and making, arranging and packing display hardware and event day necessities, you should also keep in mind how you will go through the check out process.
As for checkout, you will need a clear place for customers to come with the items they have chosen, a bagging station/gift wrap or tissue paper and craft bags for their items, cash box & calculator with receipt book and your inventory list on a clipboard, handy to mark off or tally the sold items.
Similarly, you’ll want to work this into your display so that the checkout station is easily accessible and logical for both you and customers. It’s a good idea to have it to one side and near the forefront so that you can interact with customers, but still have your belongings behind the table/stall.
The checkout station is a good place to include business cards, a mailing list, hard candies for customers to take, and a tall stool so that you can rest at a comfortable level, without being out of sight (like with a folding or camping chair).
PACK IT UP
In conclusion, you are now prepared to hit this season’s craft fair circuit with a throughout craft fair packing list, display ideas, a layout with photos, and your payment station. Having all of these things thought out, planned and written down prior to the start of the season will let you focus on crafting and selling rather than stressing about setup and packing.
You’ve done a mock setup, you’ve planned, you’ve checked the list twice. It’s time to go enjoy being a vendor throughout this craft fair season selling what you love to people who will love your handmade treasures and making new friends.
Happy Crafting!
LOVE IT, PIN IN